Pencil Points Don’t Bend:
Description of Technique and Work Process
![]() Click here to download a pdf describing Billy's Method »
Click here to download a pdf describing Billy's Method »
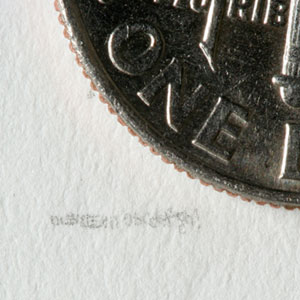
Here, Billy Pappas demonstrates the size of the marks used for his portrait of Marilyn Monroe. A series of vertical/horizontal lines and the first eight letters of the alphabet, including an exclamation point, were made next to a dime. Photo by Edward S. Davis.
What type of artist am I?
I am a fine artist who specializes in drawing. I use graphite leads of all available consistencies, from 6B through 9H.
I use heavyweight, hot-press watercolor paper as my substrate. Most of my work is portraiture. My work has followed a very distinct and linear progression, the portrait of Marilyn being the most technically advanced.
What is the work that I am presenting?
It is a portrait of Marilyn Monroe, approx 16.25” (w) x 12.75” (h). It is a nearly life-sized bust, featuring my subject’s entire head, from the pit of her neck and showing the tops of both shoulders. I am providing a depth of resolution which has never before been achieved or seen, and a level of unprecedented verisimilitude. It is a type of work and a product like no other. How can the subject of my portrait become even more alive? ...by meticulously portraying every nuance.
Why did I want to create this particular image?
Portraiture has always been a strength of mine. Most rewarding for me is having the ability of being able to bring to a portrait the unmistakable likeness of my subject. I had always worked toward increasing the fineness of my technique and my ever-present reverence for naturalism sharpened my sense of mission. So I set out to create a portrait which could serve as apotheosis for naturalist portraiture and set a new standard.
I wanted to make my drawing look as if Marilyn herself sat inches from me as I drew, giving me her full cooperation.
Why choose Marilyn Monroe?
Marilyn belongs to all of us. Her visage is arguably the most ubiquitous in history. And her having already been the subject of countless artists made her image an even greater challenge through which I could introduce something new. I especially liked Richard Avedon’s portrait, engaging because it showed Marilyn’s thoughtfulness and vulnerability. Moreover, the Avedon portrait possesses a very soft—if any—focus. These characteristics made this particular image a perfect vehicle to serve as my point of departure.
How large is my work area?
My work area is the size of a period at the end of a sentence, as it appears in a newspaper. Again, that is my work area; the actual marks I make are much smaller.
How do I achieve such precision?
First, I work with my drawing mounted at a ninety degree angle. This way, the basics of proportion and scale are more clear and evident.
I stand with my back straight and my drawing (right) hand resting on a support just above the surface of the paper. I expose only the area on which I am working at the moment, as a way of protecting the paper from stains, etc. On my head I wear loupes and in my left hand I hold an additional magnifier. In order for the exact spot to remain in focus I must keep both of my arms very still. For help, both of my arms rest in padded slings which hang from the top of the drawing board.
This body lock affects my breathing. Normal breathing moves my upper body too much. I adjust by breathing more with my diaphragm and it feels like I have less air in my lungs. In the event that I suddenly need to speak I must first change position.
The area on which I am working must be at my eye level. I achieve this by elevating either the table or myself.
More about working such small areas, and building upon them...
I must work each tiny area singularly, while making sure that the larger area—the sum of so many tiny spaces—works as a tone. So I have to stand back often and look—without the magnification—at the overall thing and make sure that my tiny additions of finished drawing are not beginning to get too dark or light. This would cause a gradation I do not intend.
Especially important is the background, where nothing else is featured. It has to be an electric airy space, nothingness. It has to contain no thing which would distract the eye and suggest form. This way, all visual events—the darkest darks, lightest lights, gradations, textures, edges—become the purposeful language of my subject.
How do I prepare myself?
To simulate intimate conditions I amass extensive reference material/knowledge about my subject. My sources are photographs of her, any and all photos, and moving pictures. Also I read about Marilyn. I do not copy photographs. Instead, they are crucial as I try to re-kindle her likeness and spirit.
In addition, and most importantly, I used live models for this portrait, even myself.
How do I engage in life drawing and use live models?
Essentially, this is an exercise in life drawing, despite the fact that my subject is dead. During the Marilyn portrait my eyes were only about four to six inches from my model’s cheek, shoulder, or point of interest, as I made simple sketches and wrote many notes to later guide my finished work. Live models gave me the best access to surface texture, which is the most distinguishing characteristic of my technique.
Why did I use myself as a model?
As I worked on each of Marilyn’s eyes, I made up my own eyes to look like hers. I learned about how her make-up artist used eyeliner and mascara, etc., and then I took lessons from current make-up artists. Then I would apply make-up to myself and work as I looked into a small, hand-held mirror. Often I would have the mirror in one hand and a pencil in the other. And I used the same approach when work commenced on her lips, her moles and freckles. Only this way did I have the source I needed and a way to observe the nuances which would later distinguish this portrait.
For example, I never found a single photo of Marilyn in which I could see the veins in her eyes. But my drawing features such things.
Explaining how I drew her hair...
Before I begin to draw a lock of hair I first plot where the highlights are going to be. In this case, a highlight is often just a single hair or a part of one. Then I would begin to plot the darkest areas and work the surrounding area, but leaving the “highlight” as a tiny path of untouched paper. Often this area was only as wide as an actual hair. And particularly arduous but critical is to draw right up to and along the edge of the path of untouched paper, while keeping the tone even on each side of the path. Anything but a precise evenness or smoothness of tone would greatly interfere with the desired realism/illusion.
I would then draw inside this tiny path, making it look wider, narrower, turn, adding gradations or making it disappear. It is a bit like putting into two dimensions the things one would see by holding a single hair and turning it about. Using this technique I bring to my subject an elaborate, exquisite penumbra featuring stray hairs wandering away from her head and into space.
Doesn’t photography already show what I attempted to draw?
The fineness of my technique enables me to perform an unprecedented “ultimate focus” on my subject.
For example, even in the sharpest of portrait photos, a head of hair is slightly flawed; the intersection of strands and bunches of hair show as having slightly webbed corners. What is more, a limit of photography is that the focus of a camera can be seen only in part of any photograph. Meanwhile I can draw this sort of phenomenon as our eyes actually see it.
Therefore no other portrait is quite as exacting as the drawing I have made.
Why don’t I paint?
Terms like “trompe l’oeil” and “hyper realist” exist, however, paint media does not allow for a small or precise enough mark. Painters are still having to guide a viscous substance with the hair of a brush. This scenario is problematic because the brush-hairs move and so does the paint. Hence, there is a slight loss of control upon the point of impact. Using my technique I do not suffer such a loss. Pencil points don’t bend.